Setup and Install Monero(d) -- p2pool -- xmrig
Video Guide
Text Guide
Intro
MineXMR is shutting down! What are we going to do?! OMG!
Greetings and welcome to Kizano's FinTech where I teach you from zero to master in IT and DevOps. Nothing in this video is financial advice since I'm not a financial advisor. I'm an IT guy who's going to teach you some technical details about Monero as a service in Linux, the p2pool software to run the mining pool side chain and xmrig, some mining software that's required in order to start mining. Also, I trust you know the laws of your local juristiction. This is for education and information purposes only. If you're running short on time, feel free to use the timestamps below so you can get what you need and be on your day. If you found this helpful, it would be very grateful if you slapped that like button on your way out to ensure this video shows up at the top of search results for others seeking answers to the same questions I'm about to answer in this video. Finally, if you want more lessons on how to become a Linux master, Software Engineer, Network Admin, or Development Operations, subscribe to the channel for more in-depth details on how the innards of IT workings!
In this video, I want to walk you through how these things are setup, but also cover some of the why and how along the way. I want to provide a happy medium between RTFM and "just do what I did". I may not get everything 100% accurate everytime, but I do my best at my goal here, which is to get those dendrites to fire off and that light bulb on your head to click on.
With that said, let's begin.
Architecture
Before we dive into the installs, I did want to present to you a quick graphic to help describe some of the architecture we would be putting together here:

In this diagram, we can see the Monero daemon runs and provides the access we need to the blockchain. The p2pool software stands in the middle as a means to extract the block templates and render the information miners need in order to mine against the network. xmrig will connect to p2pool to fetch jobs to work on and will submit them back for the PoW chain.
Also notice how the wallet connects on the same RPC port. Your wallet is what signs off on the transactions that actually send your crypto from your account. Please keep that in mind for security.
Now that we understand a bit more about the high level, let's deep dive into some technicals and get these components installed and running!
Monero(d)
Monero (XMR) is a privacy focused cryptocurrency where all transactions are encoded in secret and obfuscate the flow of money. How this works is beyond the scope of this video. What I want to explain here is how to install, configure and setup your Monero service to run as a daemon. This will be required to run the p2pool software that will represent your mining pool software that your xmrig mining software is going to use to talk to p2pool to mine against the blockchain.
Download && Install
Download monero with the #getmonero link in the description below. Once you have it downloaded, let's unzip using the following commands:
    sudo mkdir -p /usr/local/crypto/monero
    sudo tar -jxvf monero-linux-x64-v0.18.1.0.tar.bz2 -C /usr/local/crypto/monero
    monero_base=/usr/local/crypto/monero/monero-x86_64-linux-gnu-v0.18.1.0
    sudo update-alternatives --install /usr/local/bin/monerod monerod $monero_base/monerod 102 \
      --slave /usr/local/bin/monero-wallet-cli monero-wallet-cli $monero_base/monero-wallet-cli \
      --slave /usr/local/bin/monero-wallet-rpc monero-wallet-rpc $monero_base/monero-wallet-rpc
Create User Account
Now, I'm not a fan of running software as myself or root unless I absolutely have to. If possible, I like to "jail" my apps and programs in their own user account and give them permission to access anything else. Let's create a user account specifically for Monero.
Let's start with the group, then create the user so it can default to that group:
sudo addgroup --system --gid=200 crypto
sudo adduser --gid=200 --home=/home/crypto/xmr --system xmr
Now, I'm assuming you ran the above as root. This will create a Unix account on this machine that can be used to run Monero going forward.
Configure
We need to create a configuration file for our daemon that it can use so it knows what it needs to
do. I'm going to be using ~/.monerod.conf as my configuration file in this example. You can use
whatever you like, just translate accordingly:
    p2p-bind-ip=0.0.0.0
    p2p-bind-port=18080

    rpc-bind-ip=127.0.0.1
    rpc-bind-port=18081

    no-igd=1
    hide-my-port=1

    disable-dns-checkpoints=1
    enable-dns-blocklist=1

    zmq-rpc-bind-ip=127.0.0.1
    zmq-rpc-bind-port=18082
    zmq-pub=tcp://0.0.0.0:18084
I'll annotate here that I tried using SSL that's embedded and offerred by Monero(d), but I could not get downstream apps like monero-wallet-cli nor p2pool to understand SSL was enabled and use an encrypted HTTP client. I'm grateful monero(d) supports SSL. I'm disapointed the other two do not.
For more information on these configuration options, how they work and what they mean, you can use
monerod --help and it will print some information, or you can visit
#monerod in the
description for a link to additional reading.
Once this configuration file is written, you should be able to start up the daemon and point it to this configuration file and it'll listen on the necessary ports.
Quick breakdown of the options:
- p2p-bind-(ip|port): These are the bind IP and Port options for the p2p network. Monero uses a peer-to-peer network connection in order to facilitate the state of the network. This program is critical to Monero operations and this Port is public to enable all the nodes to talk and find each other.
- rpc-bind-(ip|port): These are the RPC Client IP and Port options for commanding the daemon. RPC
is Remote Procedure Call or a standard for how commands are sent across HTTP connections. What's
important to note is that this port is available to send commands and instruct the Monero daemon
to do things like submit transactions, validate blocks that have been submitted to the network,
track transaction history and obfuscate, encrypt and secure the Monero network in general. If
you are not careful, you can lose your crypto with this port open, so please be careful not to
just leave it exposed to the Internet on a public port. If you do, secure it with SSL and ensure
it requires authentication, and set it to view-only with
--restricted-rpc. - no-igd: Don't do u-plug-n-play stuff with the router to open a port.
- hide-my-port: Don't announce yourself on the network as a receiving peer. Read "unlisted" rather rather than "hide", IMHO.
- disable-dns-checkpoints/enable-dns-blocklist: These were options recommended as per p2pool instruction guides.
- zmq-rpc-bind-(ip|port): ZMQ stands for Zero-Message-Queue. These are the 0-MQ bind IP and Port options that control where Monero(d) will listen for RPC-based ZMQ connections.
- zmq-pub: This is the address of the publisher will be setup to broadcast information p2pool will be using. I suspect it might be for block announcements, transfer of transaction data within blocks and other options from within the daemon itself. I haven't read all the source to Monero yet, so I can't say for certain, just speculating there. This is what p2pool will want for it's ZMQ endpoint when you run this program later in this tutorial.
With our daemon configured, let's run Monero(d)!
Run
Let's run the Monero daemon in our new user's home directory!
    cd ~xmr
    sudo -H -uxmr -gcrypto monerod --config-file=~/.monerod.conf
This is going to take some time to collect all the information it needs to catch up to the present, so we'll come back after Monero(d) has had time to catch up the Blockchain.
Now that Monero(d) has caught up on the blockchain, let's go ahead and run p2pool against it!
P2Pool
p2pool is a decentralized mining pool software that is designed to be the bridge between your Monero(d) daemon running and your xmrig or other mining software. p2pool works by having a side-chain validate transactions and sometimes those shares end up being validated as blocks on the Monero chain. When you mine for a while, you will see a share has been accepted by you to the Network. When a block is found and you have accepted shares, then you get a payout directly from that block as rewards are paid immediately as part of the block transaction. A pretty nifty way to decentralize the network even further if mining itself is properly decentralized!
Download && Install
You can navigate to p2pool.io and click on the link that will take you to Github to download the software. Select the platform that suits you and download the compressed archive. Once downloaded, I unzipped it like so:
    mkdir /usr/local/crypto/p2pool
    tar -C /usr/local/crypto/p2pool -zxvf p2pool-v2.2.1-linux-x64.tar.gz
    update-alternatives --install /usr/local/bin/p2pool p2pool /usr/local/crypto/p2pool/p2pool-v2.2.1-linux-x64/p2pool 100
Make sure the above is run as root.
Run
Let's get our p2pool up and running! P2Pool runs against your wallet, so you will want to find your wallet address and paste it into the command here like so:
    sudo -H -uxmr -gcrypto p2pool --wallet ${WALLET_ADDRESS} \
      --host 127.0.0.1 --rpc-port 18081 --zmq-port 18084 \
      --stratum 0.0.0.0:8777 --data-api ~xmr/.p2pool --loglevel 1
I run the p2pool software as the XMR user. For added security, you can create a dedicated user for
p2pool using the steps described earlier and make sure the above is corrected for that user, along
with the value to --data-api in the above command if you want to have a data directory containing
p2pool stats.
For more details, you can use p2pool --help and it will print more details.
Let's breakdown some of these options here:
- wallet: This is the wallet address you want payments to be sent. Do not use integrated or subaccount addresses as they do not work just yet. All miners that connect to this pool will automatically mine everything to this address.
- host: This is the target address that will receive all the requests from p2pool with regards to
the
rpc-portandzmq-portoptions used. - rpc-port: Target RPC port as described in your
~xmr/.monerod.conf - zmq-port: Target ZMQ Publisher port as described in your
~xmr/.monerod.conffrom the--zmq-pubargument. - stratum: This is where
p2poolwill listen for connections from incoming miner software and process mining pool server side stuff. - data-api: If you want a directory containing files that are continually updated with stats and details
you can specify this and it will be created and maintained by
p2pool. - loglevel: This is how verbose do you want your daemon to be and how much output do you want to see. Higher numbers mean more output. 6 is the max verbosity. 0 is absolutely silent.
Now that we have our pool running, I'm so excited for the next piece: Pointing our mining software at the pool and mining some coins! Let's make some Monero!
xmrig
Xmrig is mining software for the XMR token, the native coin on the Monero network. You can use this on any computer and it will use the CPU power available to mine the coins to your wallet. Since our pool will send the tokens to our wallet, we will need less configuration than a centralized pool as far as xmrig is concerned.
Let's install xmrig to mine against our pool!
Download && Install
Download xmrig from https://xmrig.com/download for your distribution. Once you have it downloaded, I unzipped it as such as root:
  sudo mkdir /usr/local/crypto/xmrig
  sudo tar -zxvf xmrig-6.18.0-linux-x64.tar.gz -C /usr/local/crypto/xmrig
  sudo update-alternatives --install /usr/local/bin/xmrig xmrig /usr/local/crypto/xmrig/xmrig-6.18.0/xmrig 100
  sudo setcap cap_sys_rawio=ep /usr/local/crypto/xmrig/xmrig-6.18.0/xmrig
Small note: I found out how to make xmrig run without root. If you want to learn about the juicy details, stick around. If you just want to get this thing up and running, skip to the next chapter using the timestamps below.
You can run xmrig without root by ensuing it has rawio admin access, hence the setcap command near
the end above. If you want to enable randomx boost to take full advantage of your processor's potential,
you can use the script from the github repository I'll link to as #xmrig
in the description below. Also in that scripts directory is the ability to enable hugepages in Linux.
You will need the msr-tools package installed to have the MSR commands installed.
Now, what I did was created a system group called msr. I changed the group of /dev/cpu/*/msr all
to that msr group and gave root access. It should look like this, when you're done:
    $ sudo chmod g+rw /dev/cpu/*/msr
    $ sudo chgrp msr /dev/cpu/*/msr
    $ ls -l /dev/cpu/*/msr
    crw-rw---- 1 root msr 202,  0 2022-06-14 10:28 /dev/cpu/0/msr
    crw-rw---- 1 root msr 202,  1 2022-06-14 10:28 /dev/cpu/1/msr
    crw-rw---- 1 root msr 202,  2 2022-06-14 10:28 /dev/cpu/2/msr
    crw-rw---- 1 root msr 202,  3 2022-06-14 10:28 /dev/cpu/3/msr
    crw-rw---- 1 root msr 202,  4 2022-06-14 10:28 /dev/cpu/4/msr
    crw-rw---- 1 root msr 202,  5 2022-06-14 10:28 /dev/cpu/5/msr
    crw-rw---- 1 root msr 202,  6 2022-06-14 10:28 /dev/cpu/6/msr
    crw-rw---- 1 root msr 202,  7 2022-06-14 10:28 /dev/cpu/7/msr
    crw-rw---- 1 root msr 202,  8 2022-06-14 10:28 /dev/cpu/8/msr
Next, add your monero user to that msr group using adduser xmr msr.
Now, if you have enabled hugepages, altered your MSR addresses properly, updated permissions correctly,
you should be able to run xmrig as a non-root user and it won't complain about permissions denied or
unable to activate certain settings.
Let's configure xmrig!
Configure
Navigate to https://xmrig.com/wizard and we'll use the Wizard to configure our miner. Click next and we'll next select "+Add Pool" with the following details:
- Host: IP address of the place where you installed the p2pool software. What's awesome is we only need 1 instance of p2pool to mine. If you want, you can setup more and add them as additional pools, but we will stick to just 1 for this tutorial.
- Port: This is the port part of the
--stratumwe described earlier when configuringp2pool. - Username: I use the hostname of the machine that's doing the mining. I also include the difficulty I last knew about the machine at the time I happened to be looking at the logs. This will eventually balance out over time, I just like to give xmrig a heads up on where to start.
- Password: This can be anything or nothing. Not required.
- Coin/Algo: Monero/RandomX
Once we have all that configured, let's add the pool and continue on!
For backends, we'll leave CPU on and the rest off since we are just CPU mining.
Set your misc options if you care to change that.
When you're done, you'll get a config file! We'll use this to configure xmrig when we run it in our next step!
For now, let's write this file to ~xmr/.xmrig.json
Run
Once you have the configuration file written as ~xmr/.xmrig.json, that should be it! xmrig will
find and load the configuration file as per what you specified.
You should see output that looks like this:
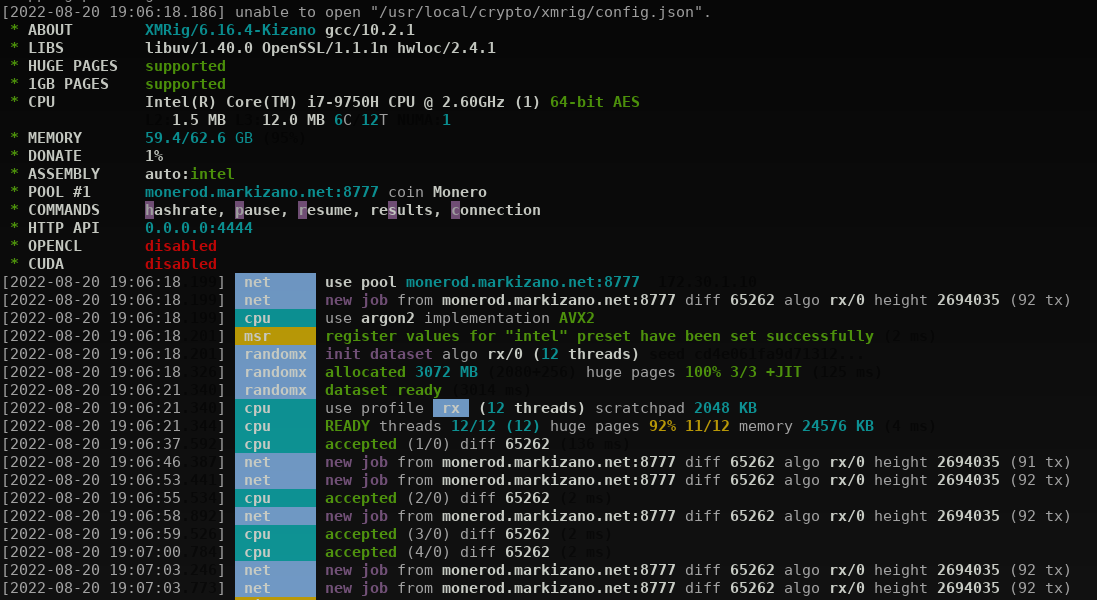
When you have xmrig running, sit back and enjoy the passive income!
monero-wallet-cli
Now that you have some passive incoming flowing, you'll want to keep track of and possibly even take profits on your earnings. You'll need the wallet in order to do that. Let's step through configuring and running the wallet. You already have the software from the Monero(d) install. I recommend you run your wallet software on a different machine to avoid the risk of exposure of your private keys.
For the sake of this tutorial, I'll run it on the local machine, but please, please be mindful of how dangerous this is.
Configure
You can create configuration for your monero client by creating ~xmr/.monero.conf and change the
value for wallet-file to whatever you want.
    use-english-language-names=1

    daemon-address=127.0.0.1:18081
    trusted-daemon=1

    wallet-file=/home/crypto/xmr/my-wallet
Breakdown of options:
daemon-address: This is thehost:portof where you will be connecting to the RPC Endpoint of the Monero(d) you setup to run earlier. The value of this argument should be the value from Monero(d)'s--rpc-bind-ip:--rpc-bind-portvalues.trusted-daemon: Since we set this daemon up and are in full control of it, yes, we will trust our own daemon.wallet-file: You can specify where you want to load your wallet file and what you want the filename to be. Take extra care with this file. I usually ensure it is owned by the wallet-user account on my Linux box and set permissions to 0600 (-rw-------) to avoid anyone else from reading it (except root).
Run
Then, to kick off the monero wallet, you can run this command:
sudo -H -uxmr -gcrypto monero-wallet-cli --config-file ~/.monero.conf
This will start up the wallet and you can use this to monitor your profits, send crypto to exchanges take profits, send to your friends or just mine and HODL.
Conclusion
Thank you so much for watching!
If you appreciate the work that went into this, then it would mean a lot if you would slap that like button on your way out. Feel free to subscribe if you want to see future videos that will help you go from zero to master in engineering, systems, networking and cloud computing with an application to finance and cryptocurrency.
For references made in this video that don't yet exist, it would be great to subscribe because then you'll be notified when that video comes into existence.
Until I see you in the next video, thanks so much for watching!
Resources
- Download Monero #getmonero
- Install Monero Guide #monerod
- P2Pool Observer
- P2Pool Website
- ZMQ Messaging Patterns
- Download xmrig
Referrals
Get started with servers:
- Linode: https://markizano.net/linode
Get started with crypto:
- Blockfi: https://markizano.net/blockfi
- Coinbase: https://markizano.net/coinbase
- CoinEx: https://markizano.net/coinex
- Crypto.com: https://markizano.net/crypto.com
Get started with investing:
- Robinhood: https://markizano.net/robinhood
- Public: https://markizano.net/public.com
- Webull: https://markizano.net/webull
Comments
Post a Comment